Elementor comes with a powerful pop-up builder.
Powerful in two different ways:
- First, the way you can apply design and content to your pop-up to match your brand style (compared to installing a 3rd party plugin that you will have a hard time to customize)
- Second, the display conditions and triggers that control under which circumstances the pop-up should show up.
You can annoy your website visitors in both areas:
- The design and how the pop up overlays other content
- Showing your pop-up to the wrong users
In this post, you will learn, how
- You can create your first pop-up using Elementor Pro
- We use pop-ups to drive traffic to our WordPress Kick Start package
- You can create pop-ups that don’t annoy your visitors
- You can track how many people click on your pop ups
How to create a pop-up with Elementor Pro
Go to your WordPress Dashboard, navigate to Templates and theme editor.
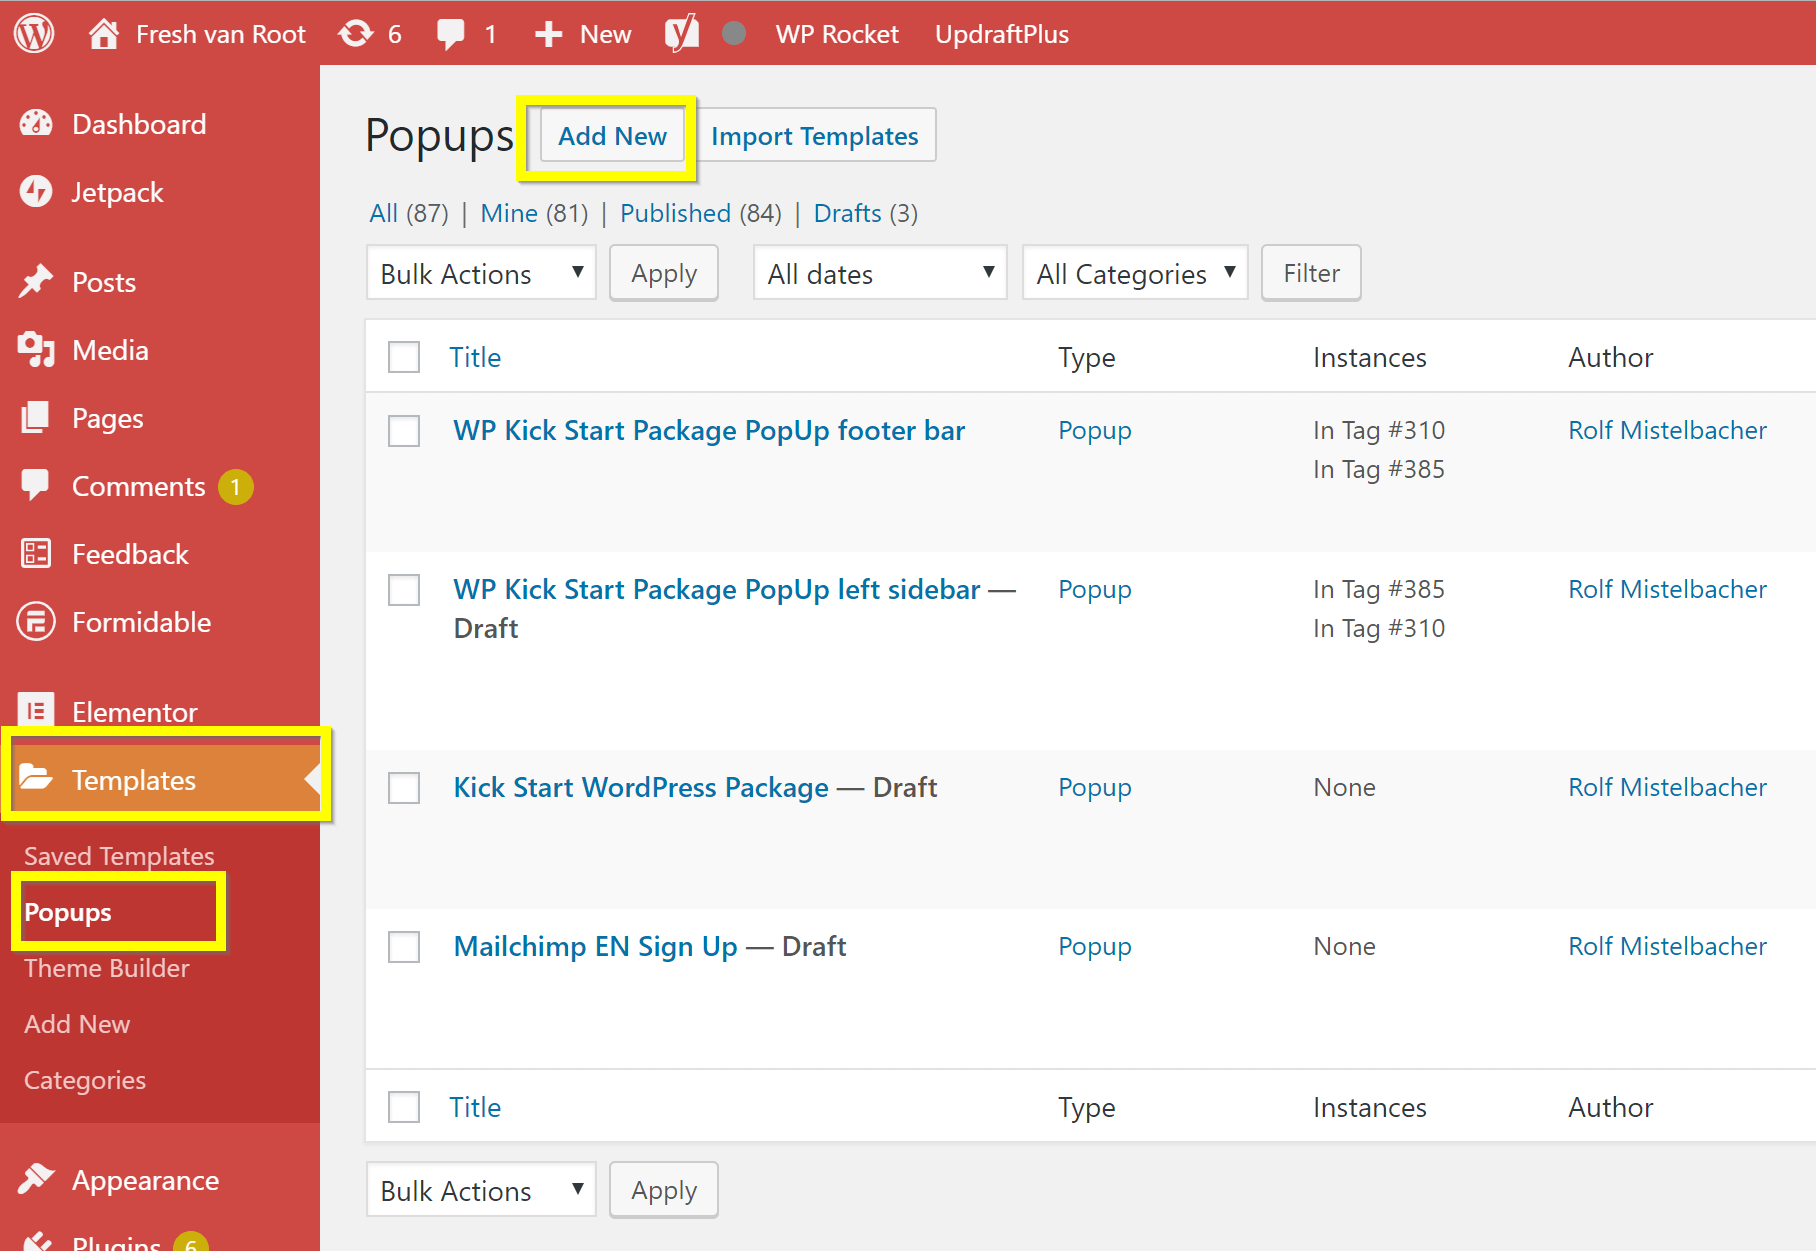
Click Add New, choose a name.
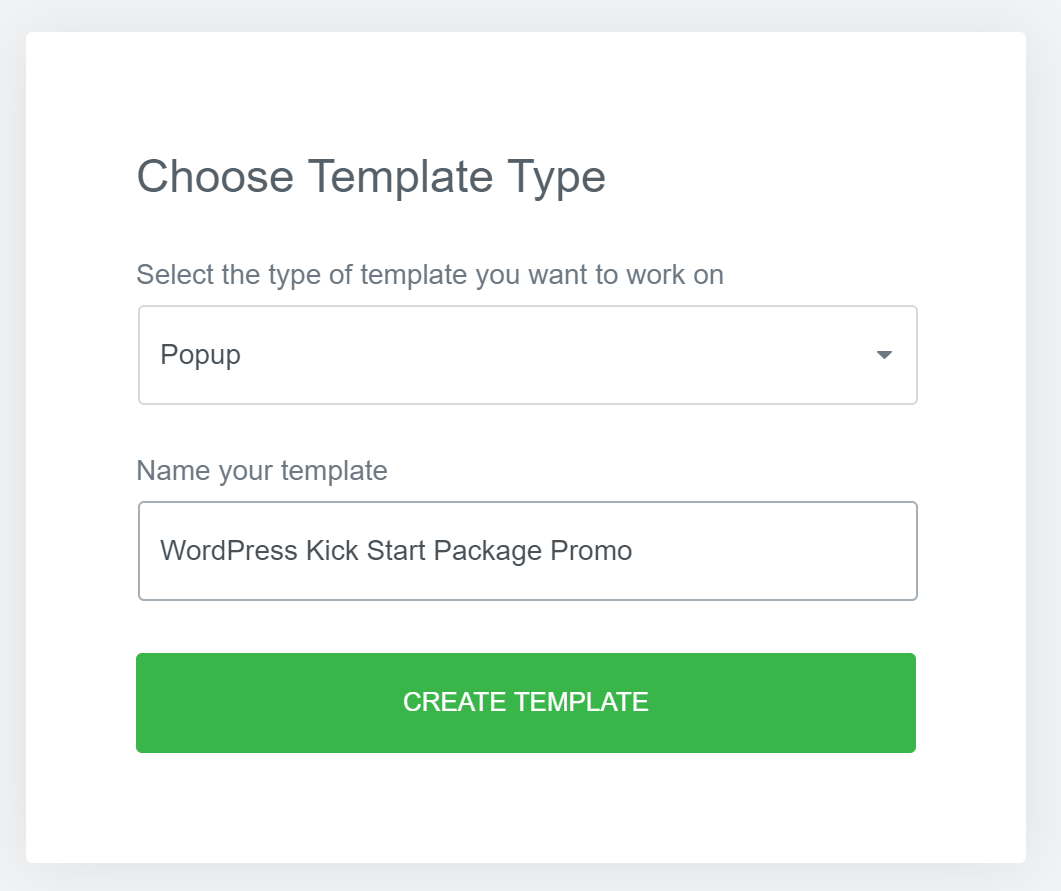
Now Elementor loads and shows you a huge list of readymade designs to choose from.
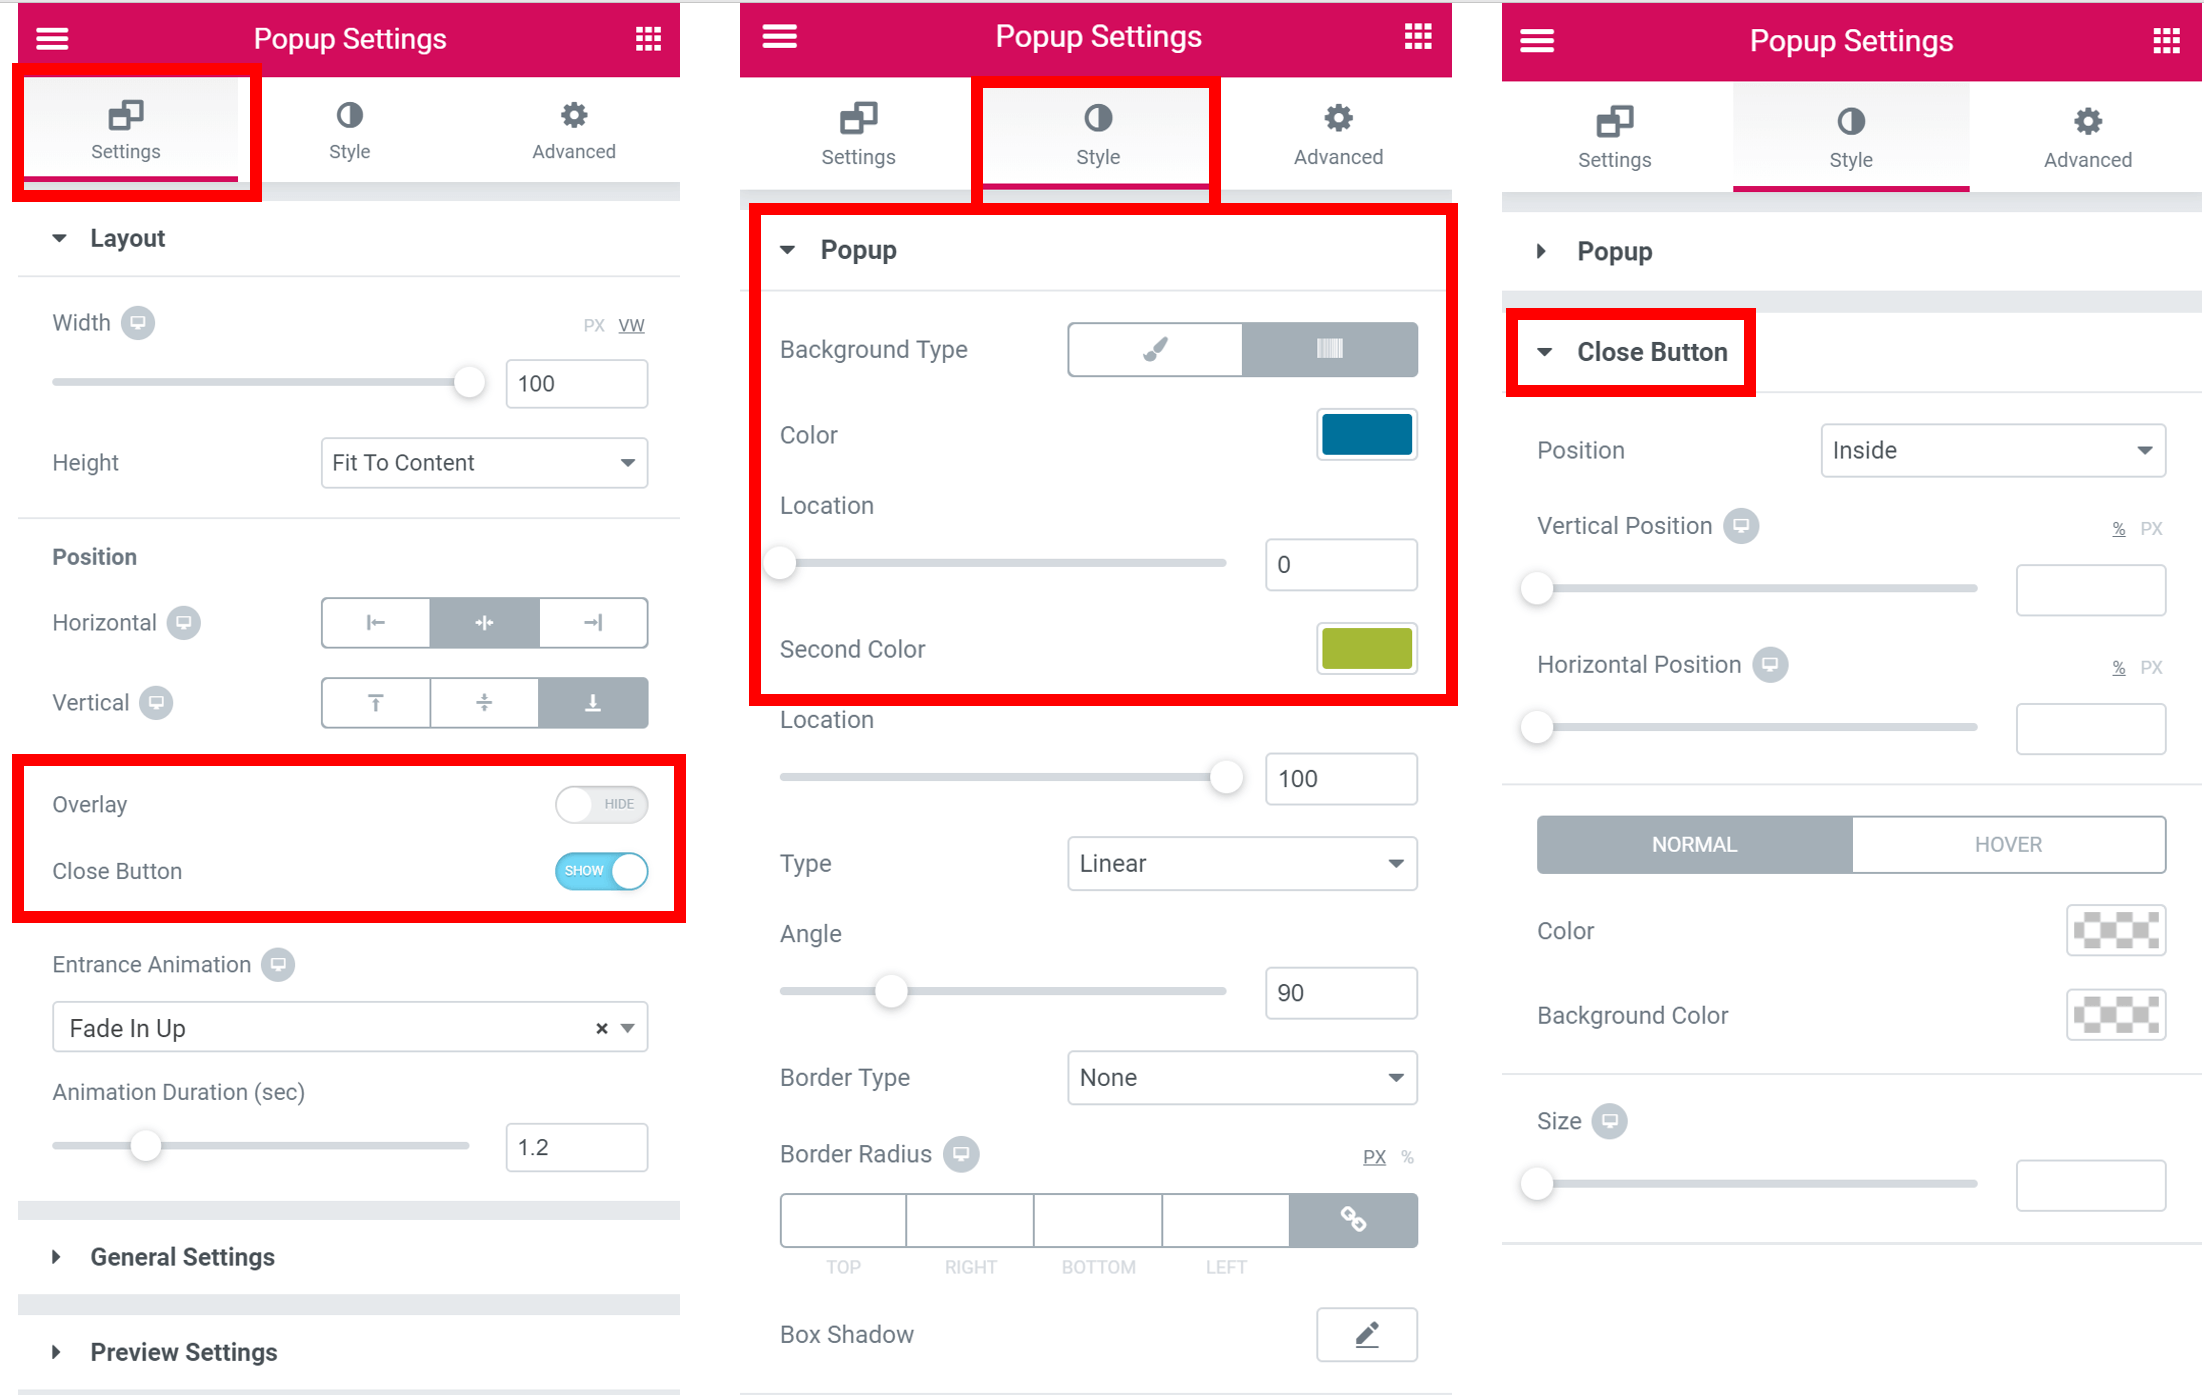
Changing the general Popup Settings
First, the general options for your pop up are managed in the “Popup Settings” panel (access via click in the bottom left corner). These options apply to the general behavior and look and feel of your pop up. Settings like background colors and the look and feel of the close button.
In the screenshot below you can see the settings I think you should pay attention to.
- Overlay: Would you like to show your pop-up as an overlay (most annoying)?
- Close Button: Should your pop-up have a close button (Yes!)
- Background settings: This can be confusing, the background style of your pop up is hidden in pop-up settings
- Close Button style: Don’t make it hard for your users to close the pop-up
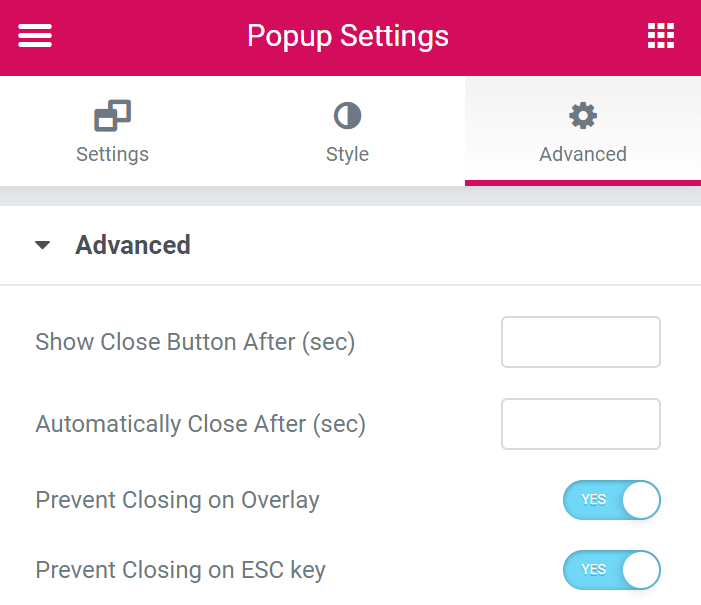
The advanced settings also have important options you should check out. You can define how many seconds should pass before the close button shows or the popup is closed automatically. Powerful options to annoy or please your users.
You can prevent closing the pop-up with the ESC key. Use this setting only if your pop-up is not taking up much screen space.
Change the Design & Content of your Popup
Second, you can change the design and content you want the popup to show, using the classic Elementor widgets. Sections, columns, and all content widgets. You could also add a MailChimp sign up form or show dynamic content (like related posts).

I am stressing this in every post about Elementor – don’t forget to do all this also in responsive mode too. Pop-Ups can be annoying, especially on mobile. There are ways to not show pop-ups on mobile in general or a different one, but more on that in a minute.
So you are finished creating your pop up. Next step: Decide when the pop up should be shown.
How to show pop-ups to the right users – and not annoy them.
This is a very powerful feature of Elementor Pro. You can be very specific under which conditions the pop-up should load. Some thinking of you should go into how to find the right balance between getting the users attention vs. not annoying or distracting them from the actual content they want to consume.
To illustrate this I am sharing how we improved the pop-up shown on freshvanroot.com.
We are offering a service called “WordPress Kick Start Package”. This service should be shown to all users interested in WordPress, Elementor, and GeneratePress. Our goal is to drive traffic to our product offer page with a pop-up.
The first way is to reach anyone reading an article about website creation or WordPress. So we set a condition to display the pop up to all users reading a post in that category.
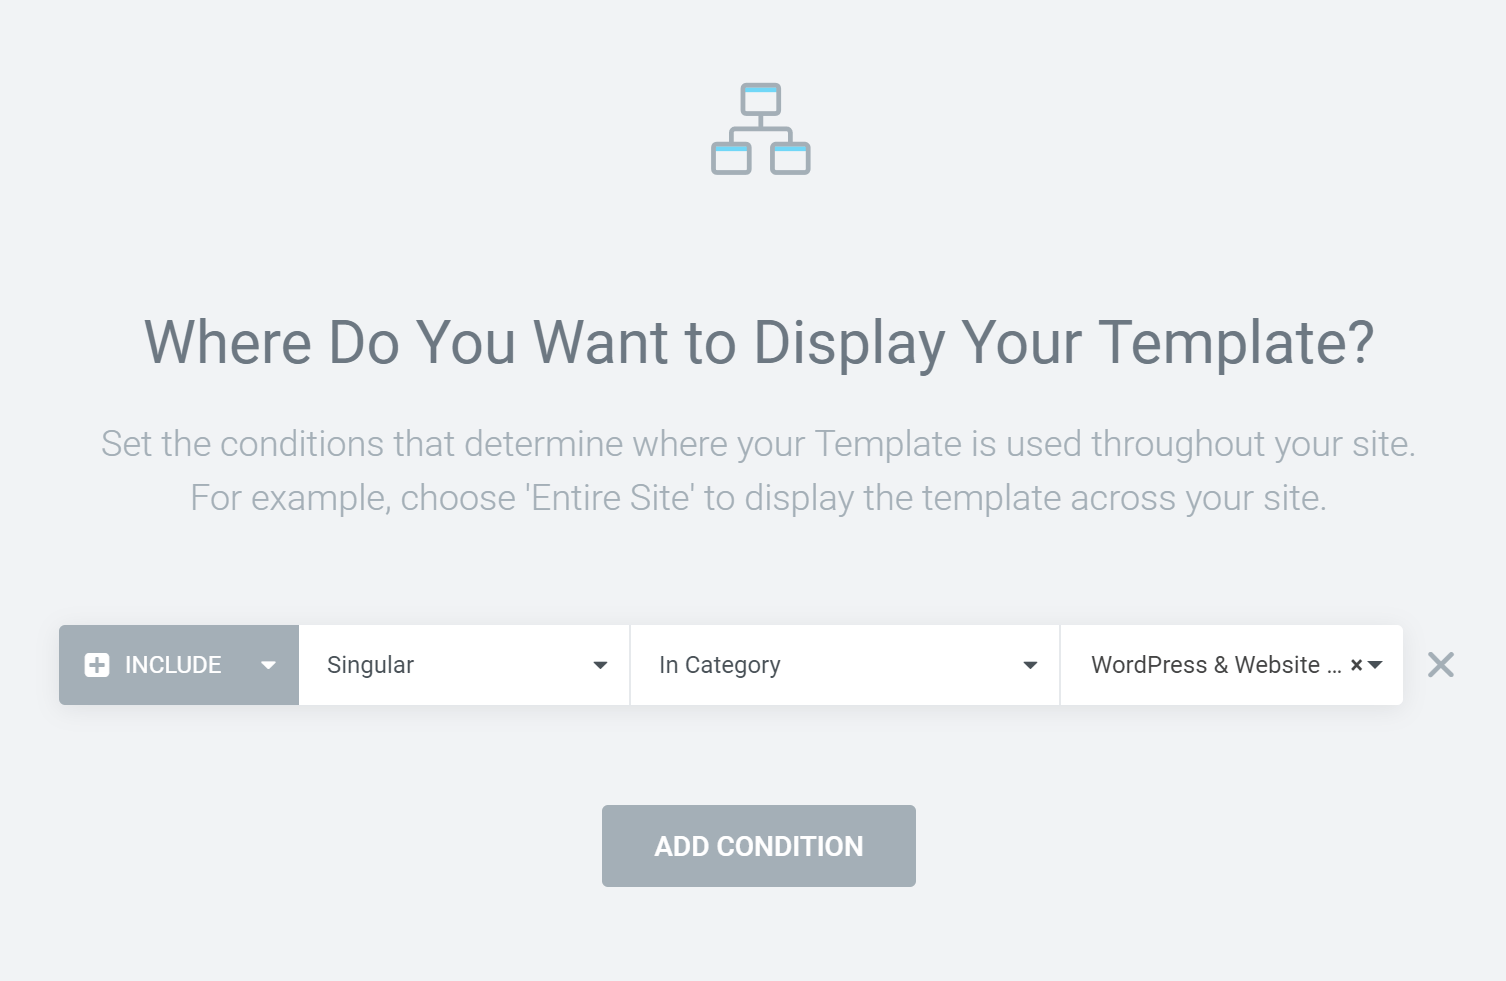
The problem with this setting: We wrote many posts about WordPress, someone reading the post about how to take screenshots of all published WordPress posts is very likely not interested in our Elementor / GeneratePress Kick Start Package.
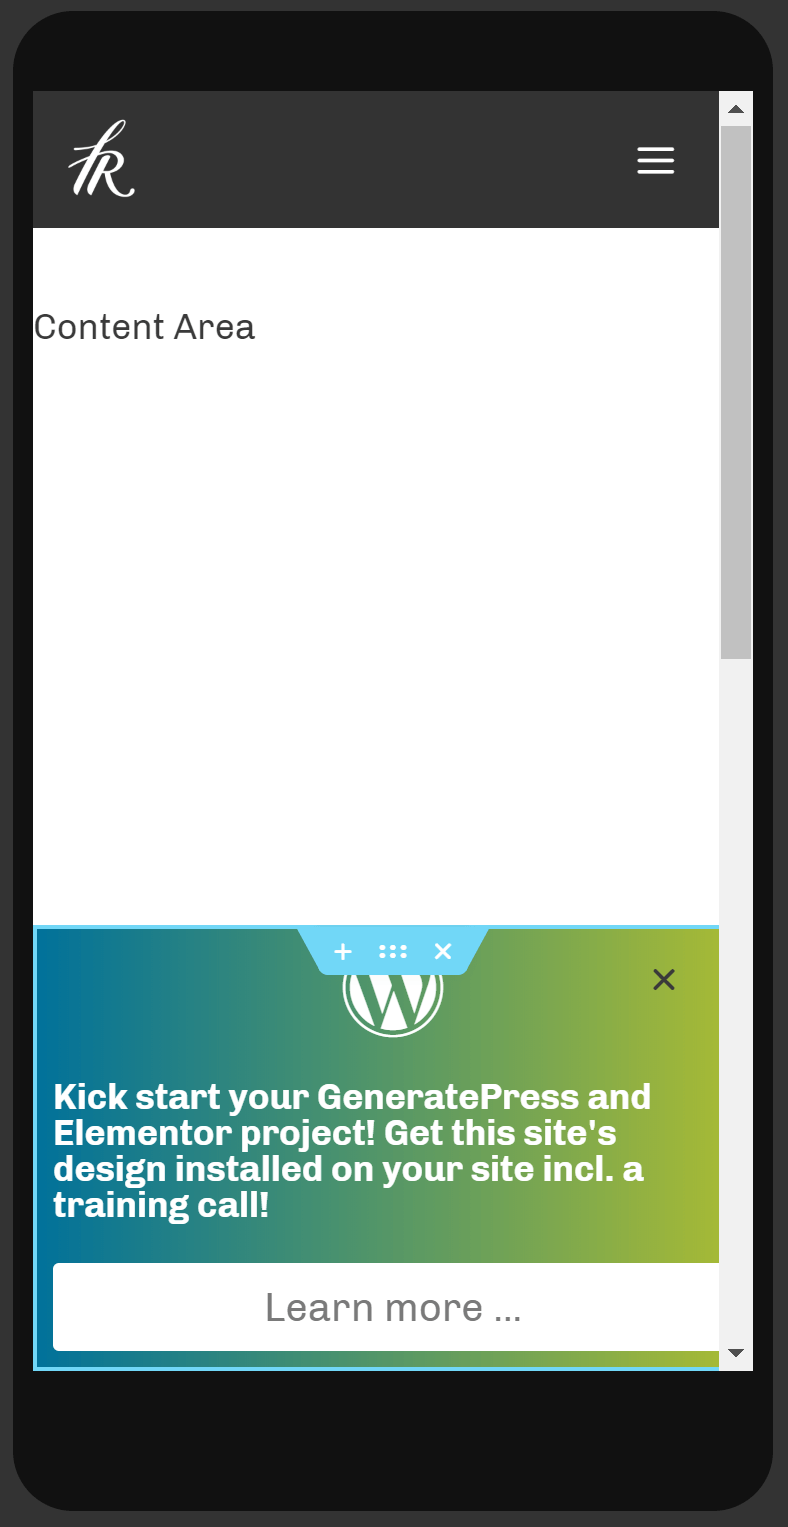
The design and animation of our first version of our pop up were pretty annoying too. It faded in from the left, darkened the rest of the page (overlay ON) and users had to click the X button to continue reading.
This version of our pop up did not work well. The first reaction of users reading a blog post was pressing the ESC key or looking for X to close it within a second (we recorded some user sessions using Hotjar)
So we put some more thinking into creating a pop up, which brings us to version two.
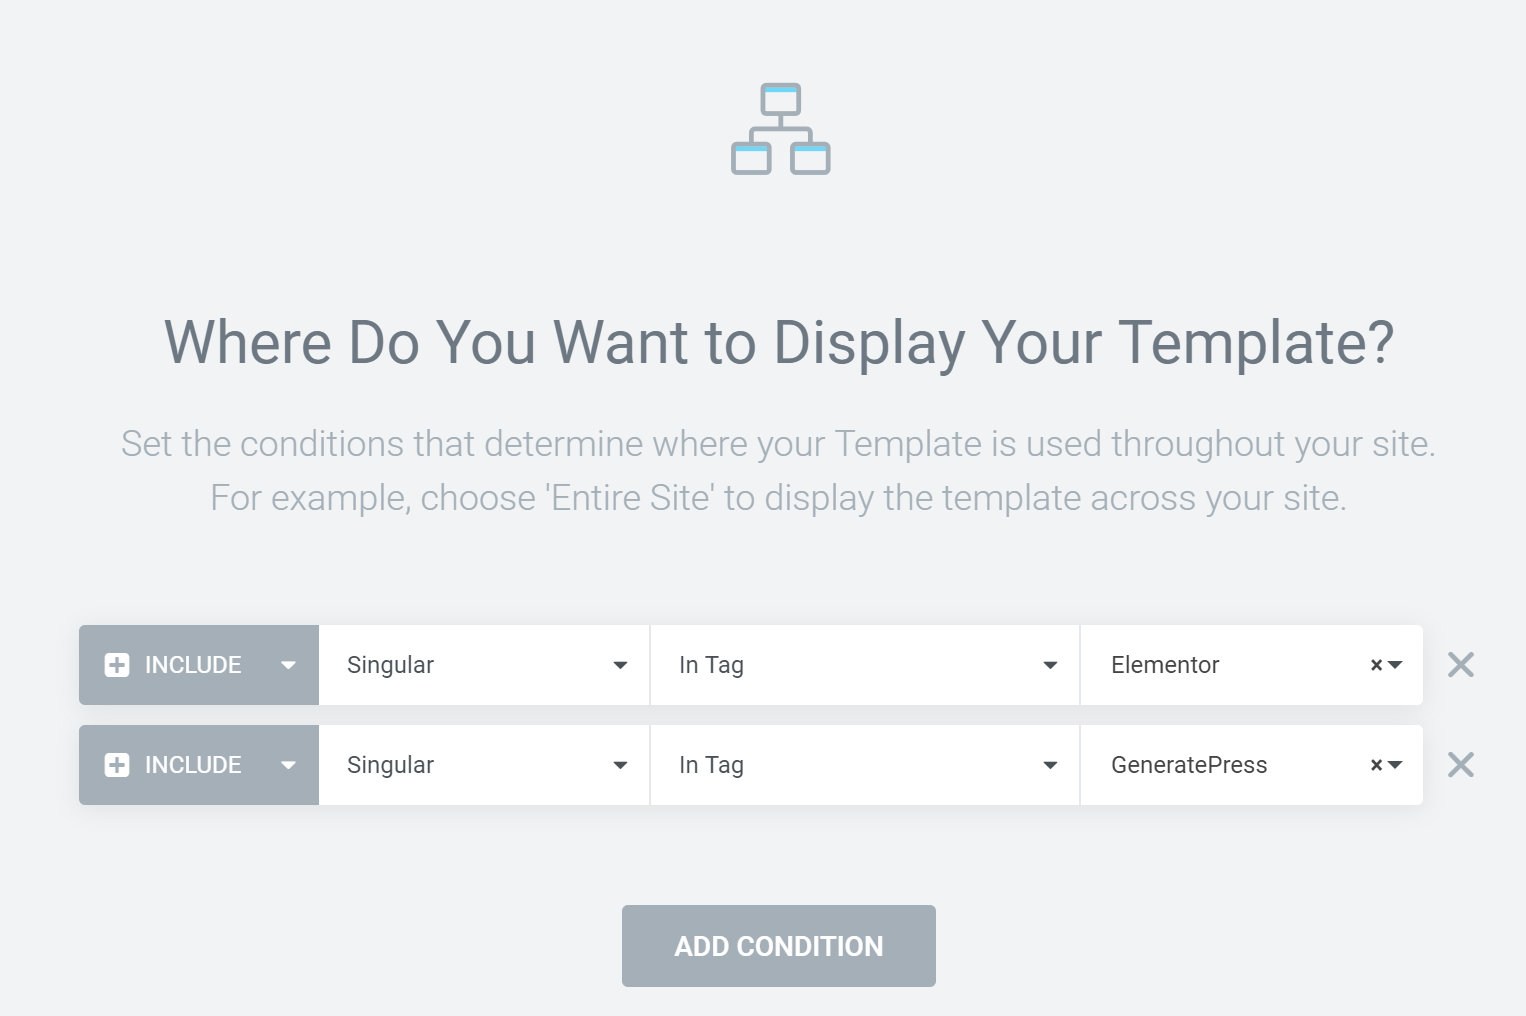
With Elementor, you can narrow down to tags also, so the pop up I am talking about is now only shown on posts that both have the tag GeneratePress or Elementor as attributes. This way the pop up reaches a smaller audience, but an audience that is very likely interested to take a look at our offering.
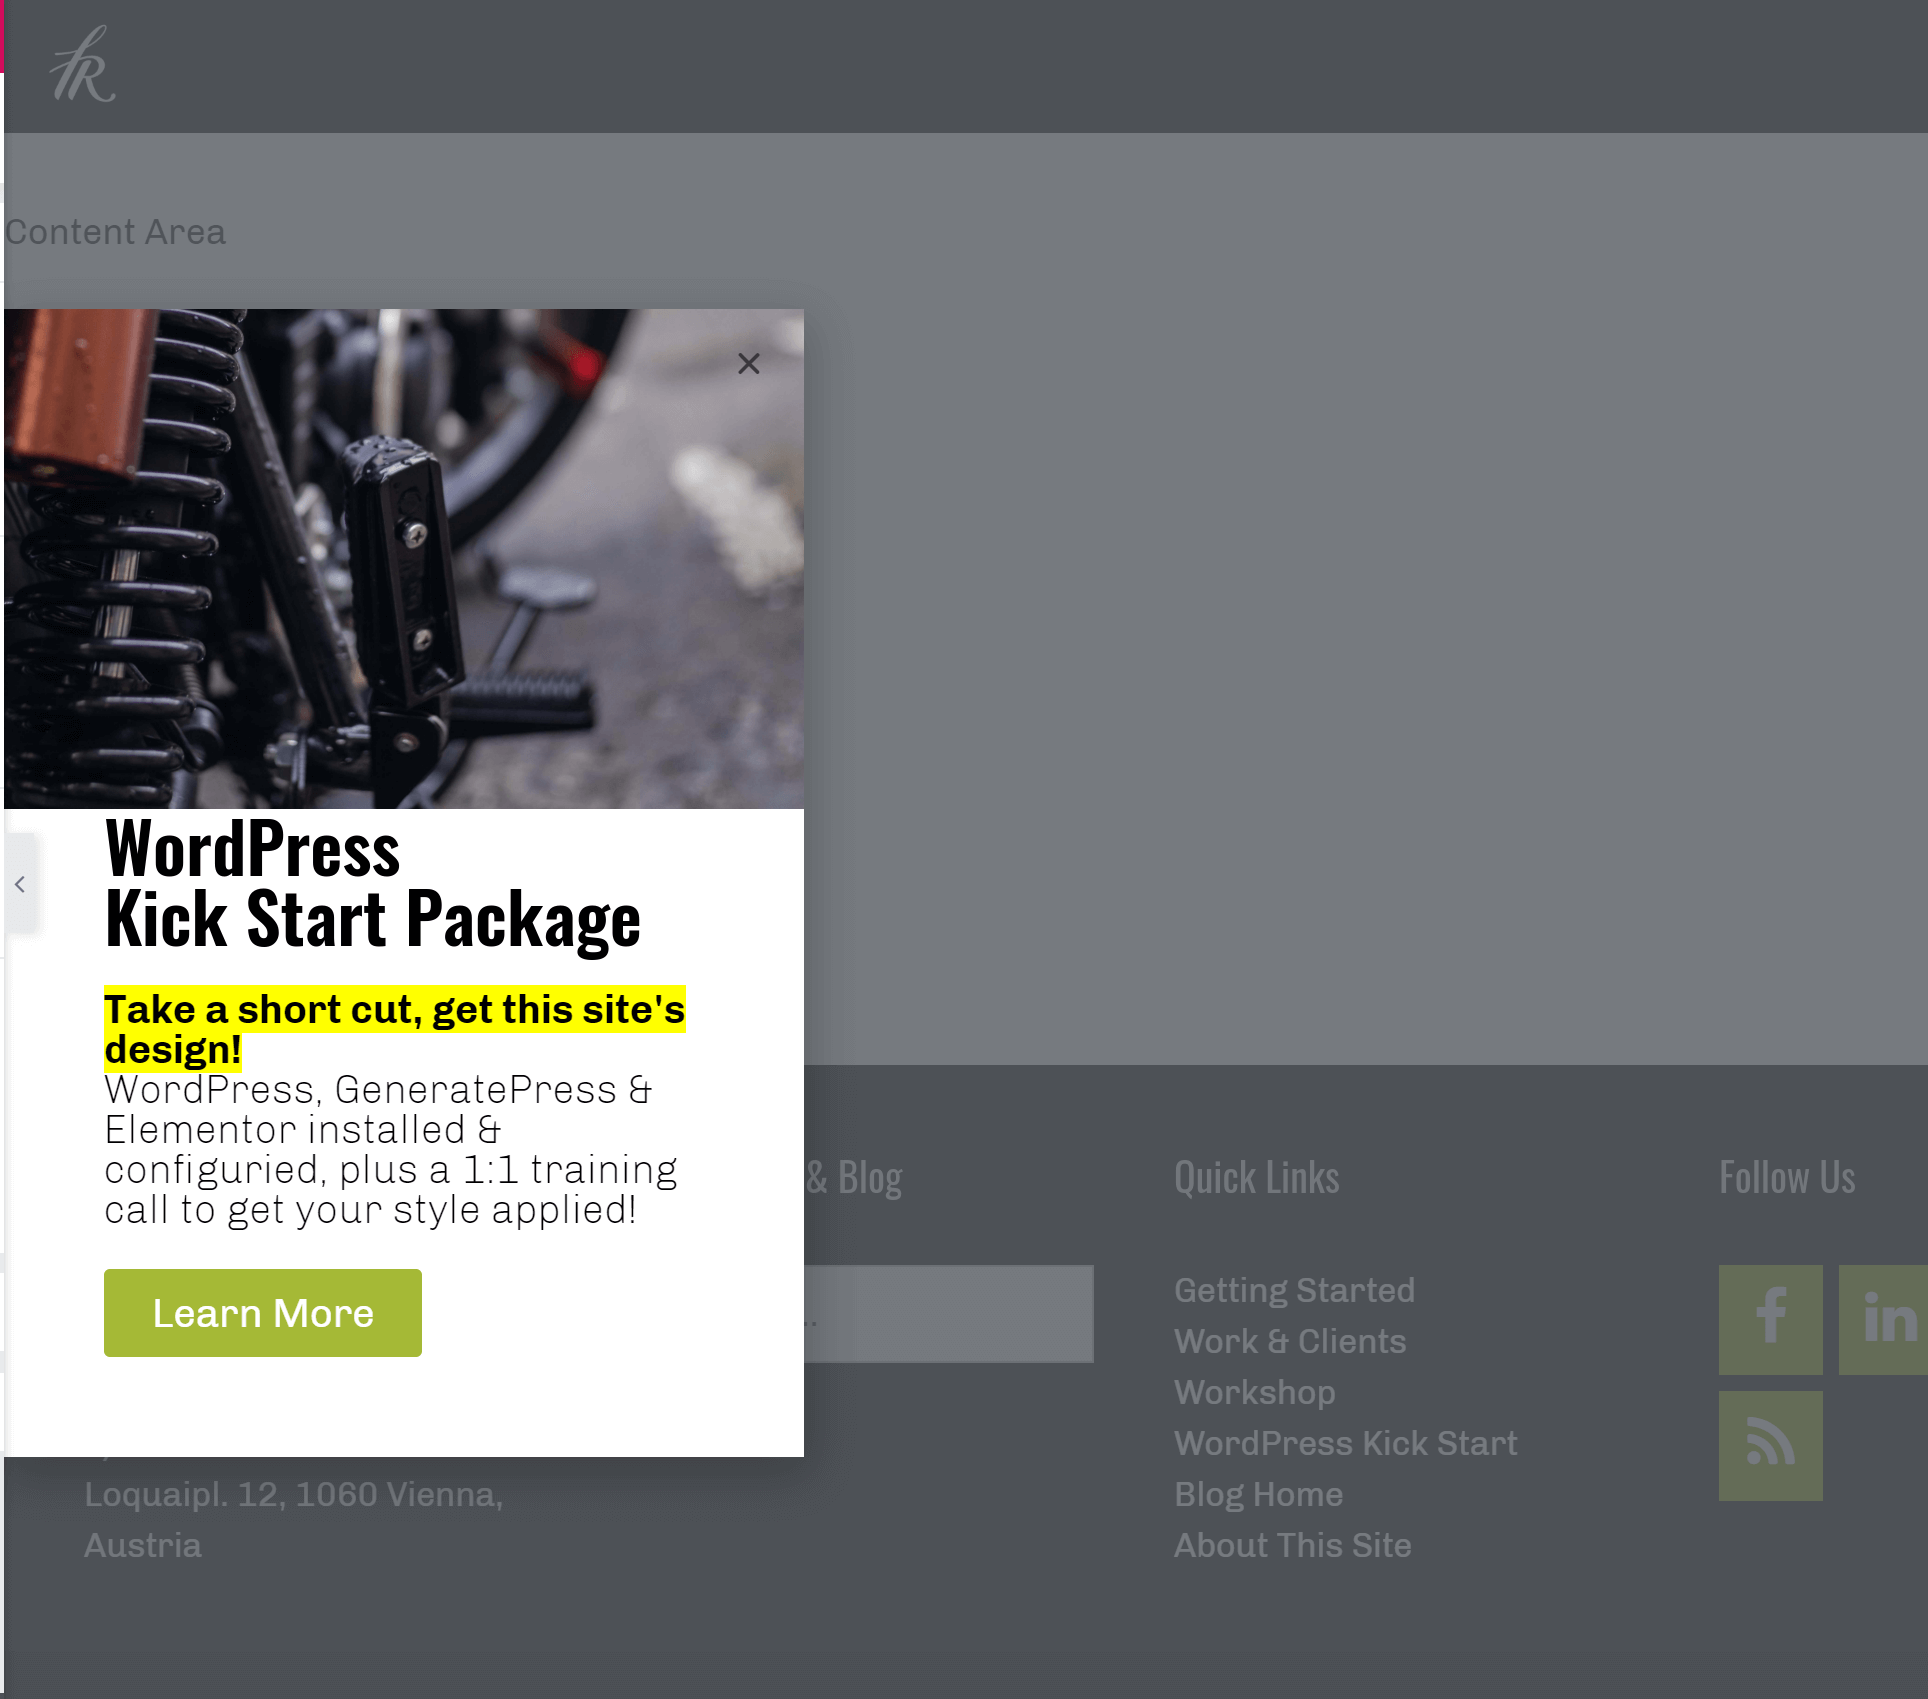
Second, we moved away from the annoying version of our pop up to a more subtle version. (Maybe you can see it right now :)).
The new version of our pop up is displayed as a footer bar at the bottom after 20 seconds. It does not darken the background, and it can only be closed by pressing the X and not the ESC key. This pop up is performing better. Readers are not distracted (or less distracted) from reading the actual post, but still, need to spend a little time checking the content of the popup if they want to close it because just clicking somewhere on the page or pressing the ESC key does not work.
Other display conditions to consider
- The time before the popup is shown: For our promo pop up we decided to wait 20 seconds before it is shown. This way, someone could read a few paragraphs before someone can learn about the offer
- Exit Intent pop up: This is very common today. I never looked for statistics but telling from my own behavior I never engaged in exit intent pop-ups. Some users do, otherwise, no one would create such type of pop-ups. Maybe we just don’t have enough traffic on our site.
- Responsive: You can hide or show pop-ups on desktop/tablet/mobile if you want to create a separate pop-up on mobile that takes up less space.
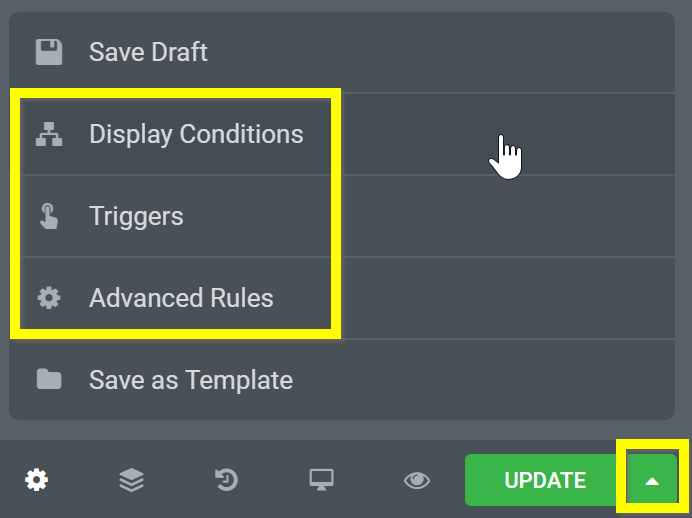
These settings are configured in Triggers and Publish Settings.
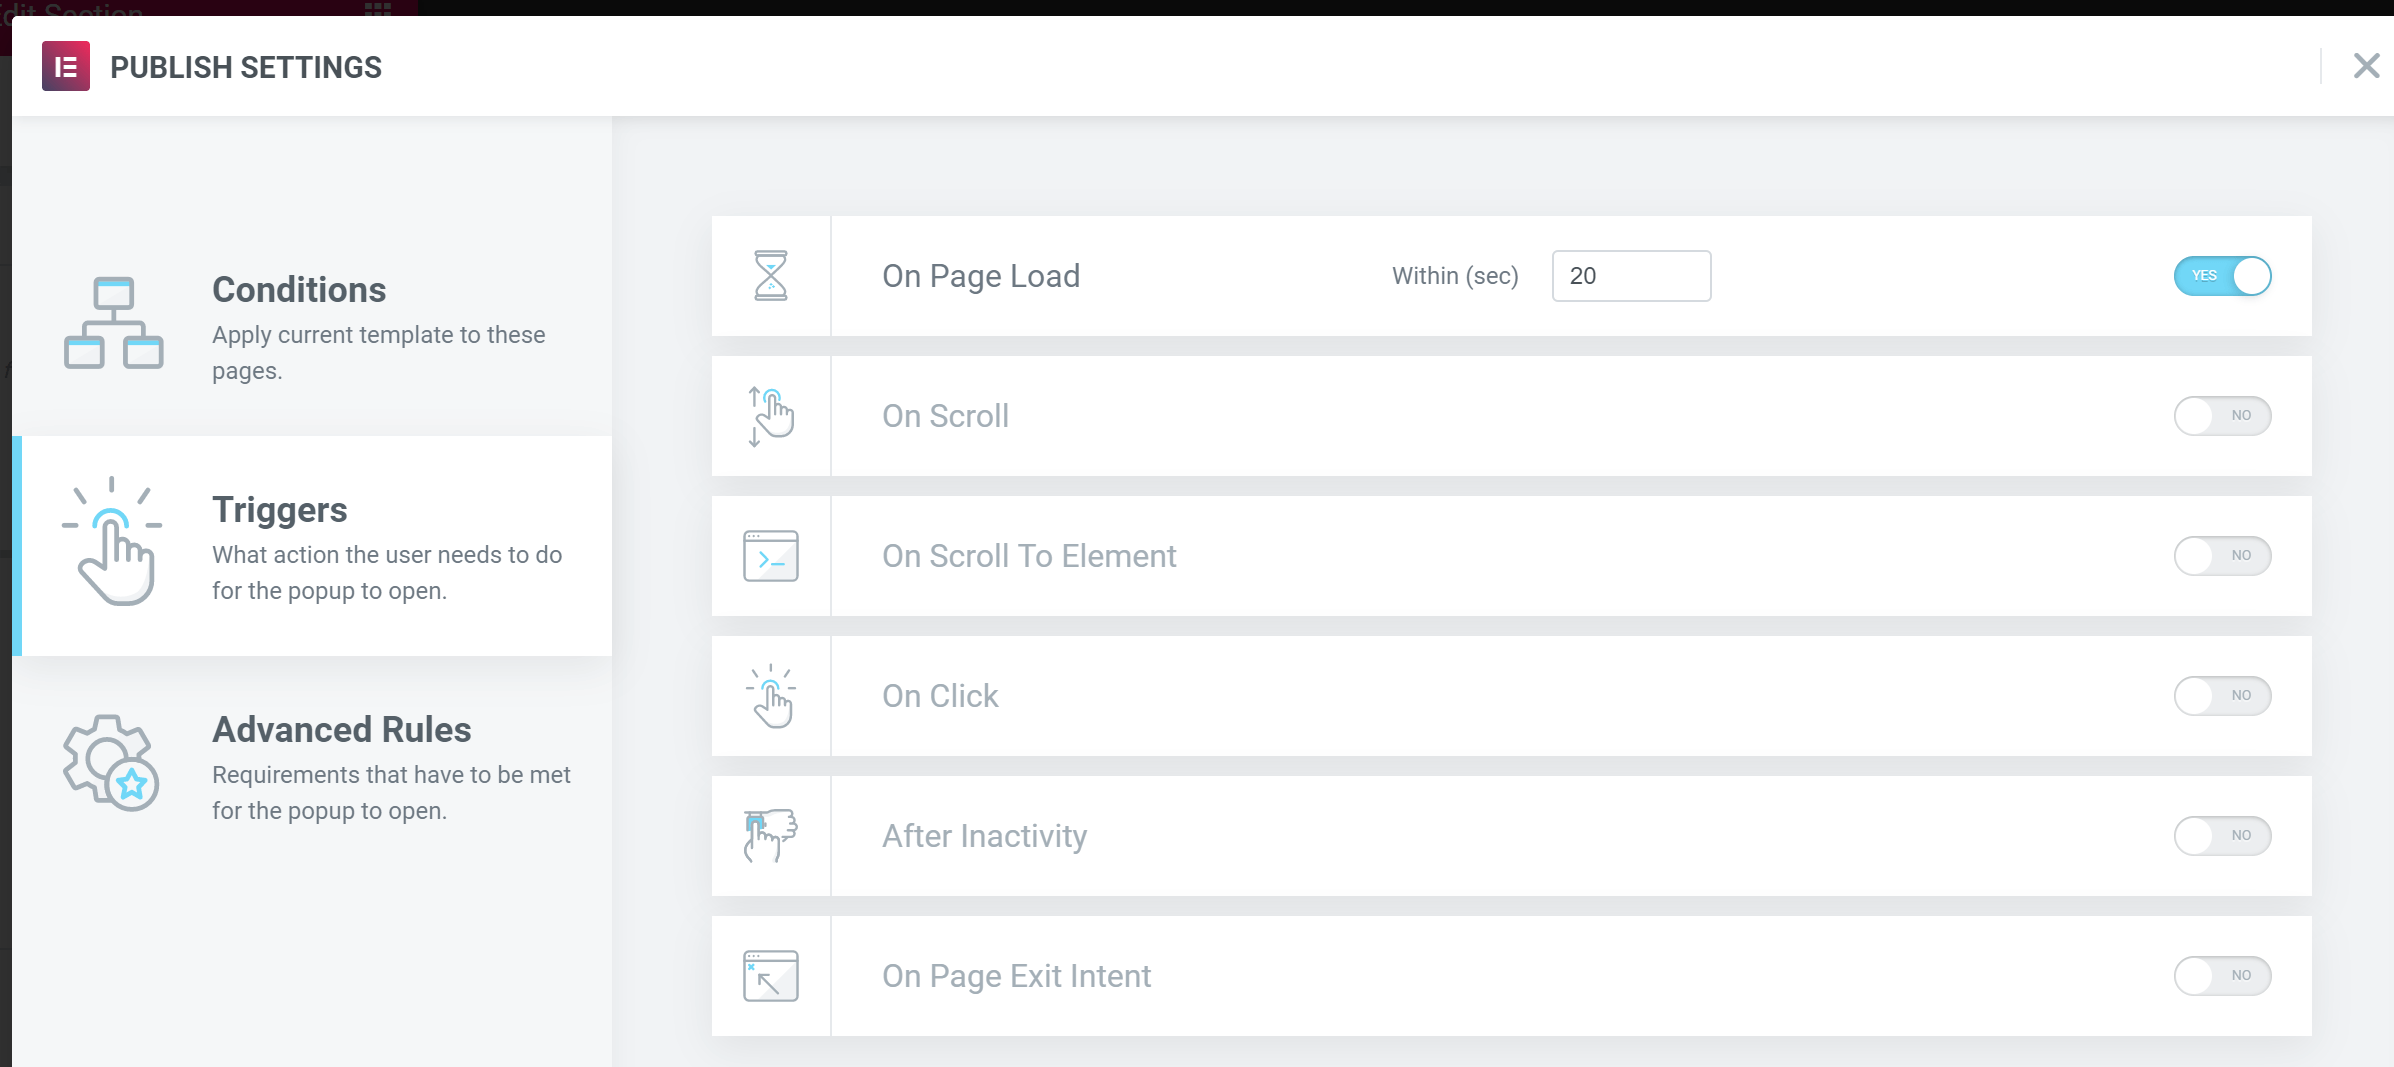
Triggers
Define what action loads the pop-up. I do dislike the On Page Exit Intent pop up, as written above. We use On Page Load and On Scroll (Percentage of page scrolled).
On Click can be used to set a number of clicks that need to happen before the pop-up loads. On Scroll to Element allows you to set a CSS class that the user should scroll to first. Users tend to scroll a post up and down before actually starting to read, so we figured that is not useful for our needs. The pop-up could fire up before the user event read a paragraph.
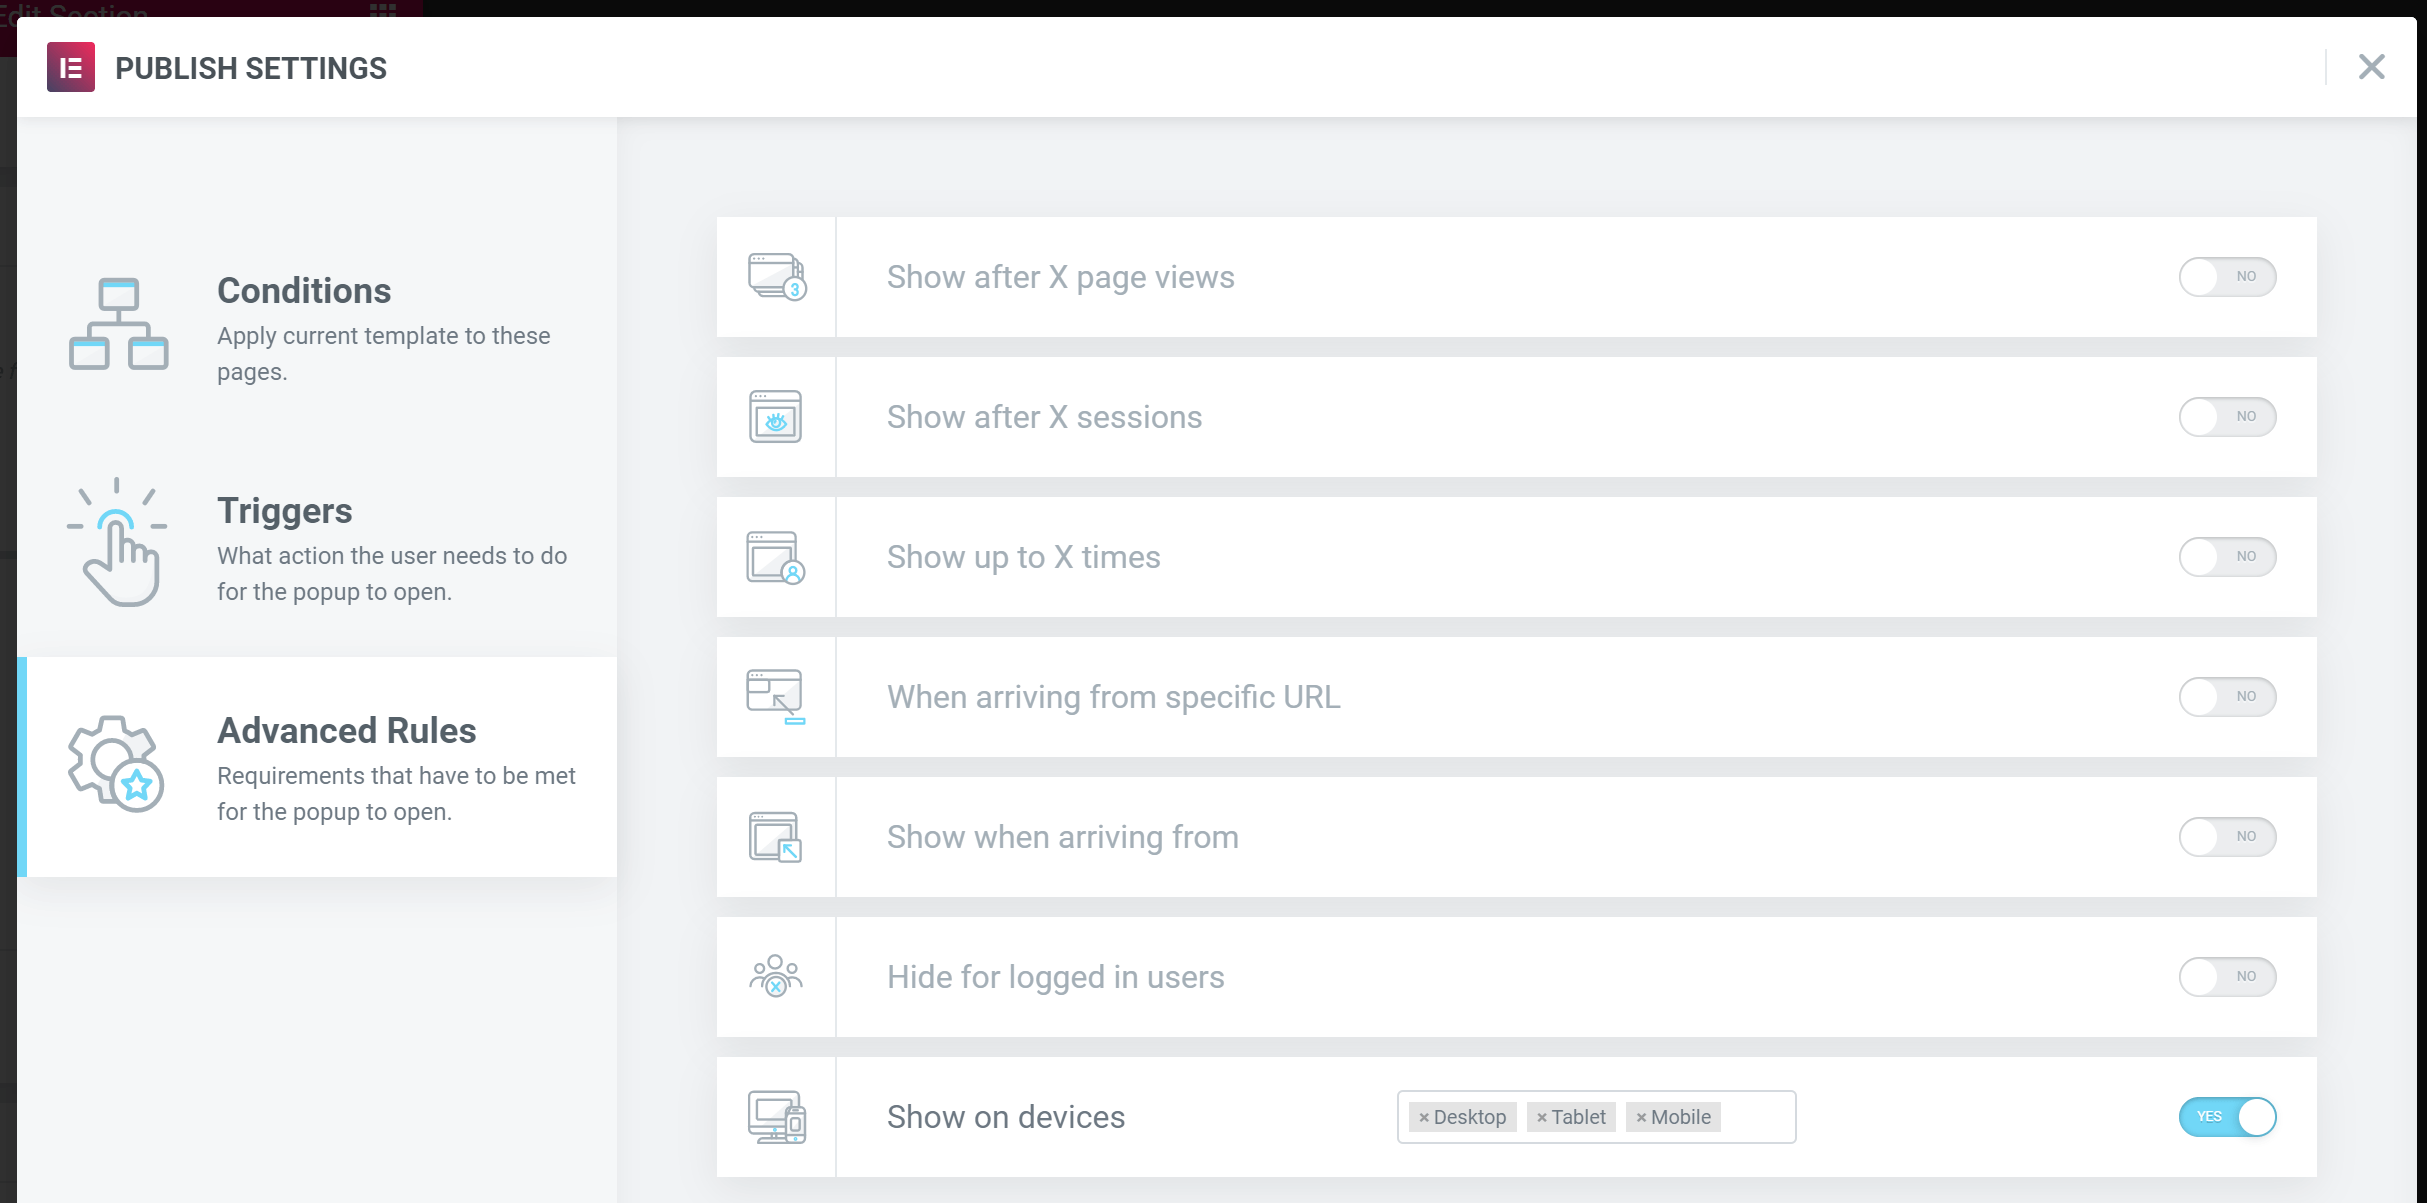
Publish Settings
While the display conditions allow you to be very specific on which pages or posts you want to show a pop-up, these settings can be used in addition to defining how often a pop-up is shown, or only for a specific amount of sessions.
The more complex your website is the, more time you will need to play around with these settings. If you have a website with a few static pages you might not change these settings at all.
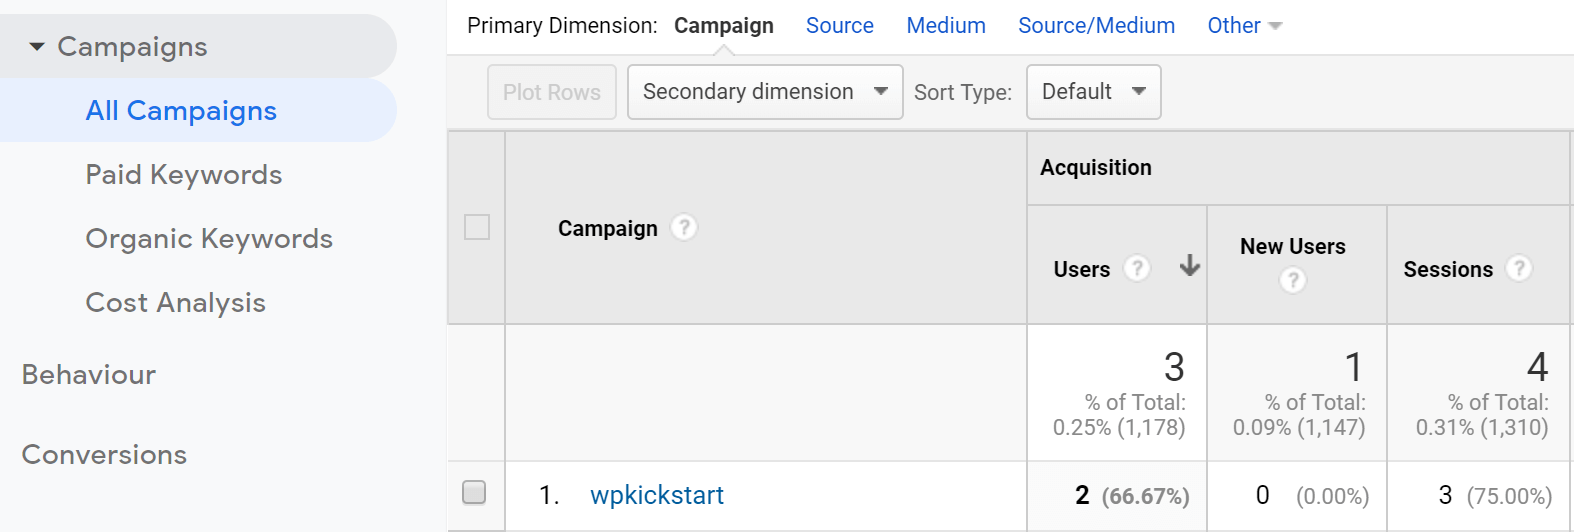
How to track clicks in Pop-Ups
That is a bit off topic here, but just in case you don’t know. You can use the Campaign URL Builder from Google to create links that you then use within your pop-ups.
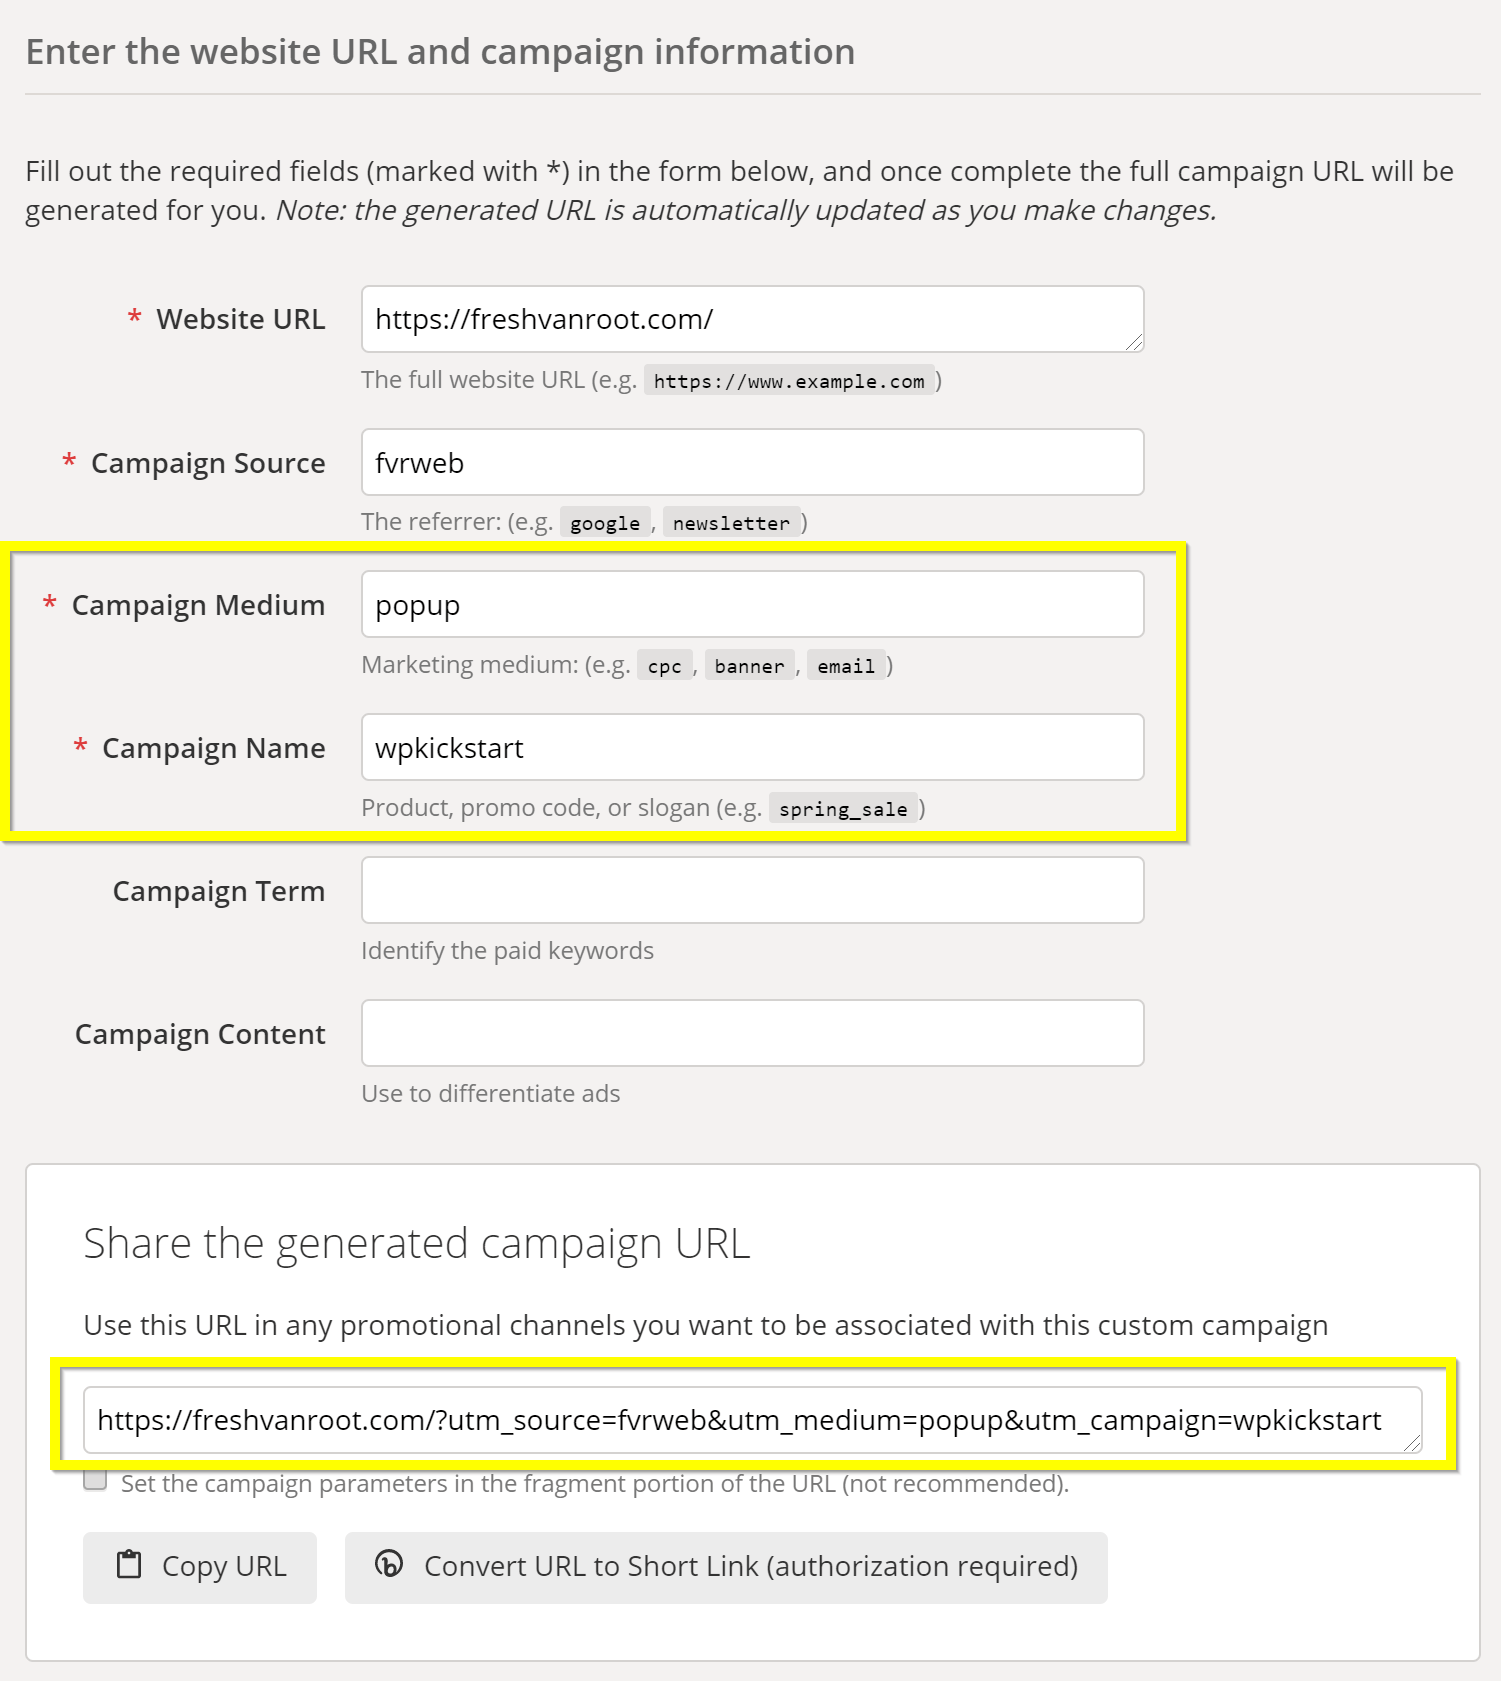
In Google Analytics, you can see a reporting on the number of clicks the links got.
Conclusion
The pop-up builder feature that comes with Elementor Pro is powerful and easy to use. You can delete other WordPress plugins if your whole site is managed with Elementor. One of the many pop-ups provided within the gallery will likely meet your needs and you can start customizing.
Finding the right balance between getting the users attention and not annoying them is easy with the options Elementor Pro gives.
In this post, you learned how we use pop-ups to drive traffic to a specific offering. You can create pop-ups for many other use-cases using Elementor, check the official page to learn more.