Until recently you needed to use a 3rd party service like Zapier to connect your Facebook lead ad with your CRM.
Now Facebook can connect directly to your CRM, which makes the setup process easier.
The list of supported CRM tools is huge. I searched just for a few big names, like Salesforce or Microsoft Dynamics. Facebook has put up a page to check if your CRM is supported.
Here is a quick walkthrough, how to set up your lead ad.
This real-world example is showcasing how we feature our newsletter in a lead ad on Facebook and sign-ups are connected to our Mailchimp list.
I am assuming you know how to set up Facebook ads, so I am only covering the basics of that process.
You create a new campaign with the objective of lead generation.
In the next step, you define your target group, budget, and where the lead ad should run.
Then you will start editing your ad.
Editing the ad is not different compared to other ads on Facebook, except that with this ad type shows the option “Instant Form”.
Take your time for editing the form. If you get it wrong you can create a new form based on an old form, but you cant edit an existing form.
The form editor is pretty simple. You need to add all the basics:
- Form title
- Headline
- Description
- Add the necessary form fields
- Link to your privacy policy
- Add a link on your Thank You screen users can browse to after submitting the form
We only collect the email address for the newsletter sign up. After submission, a user is sent to our blog.
One important setting you should take a look at is the share option for your form. You can allow users to share your lead ad. By default, this is set to restricted. Depending on the type of leads you want to connect it can make sense to choose Open.
In our case, we are okay with people sharing our newsletter sign up form on Facebook.
Now we submit the ad for review and the campaign starts running and bringing in leads (hopefully).
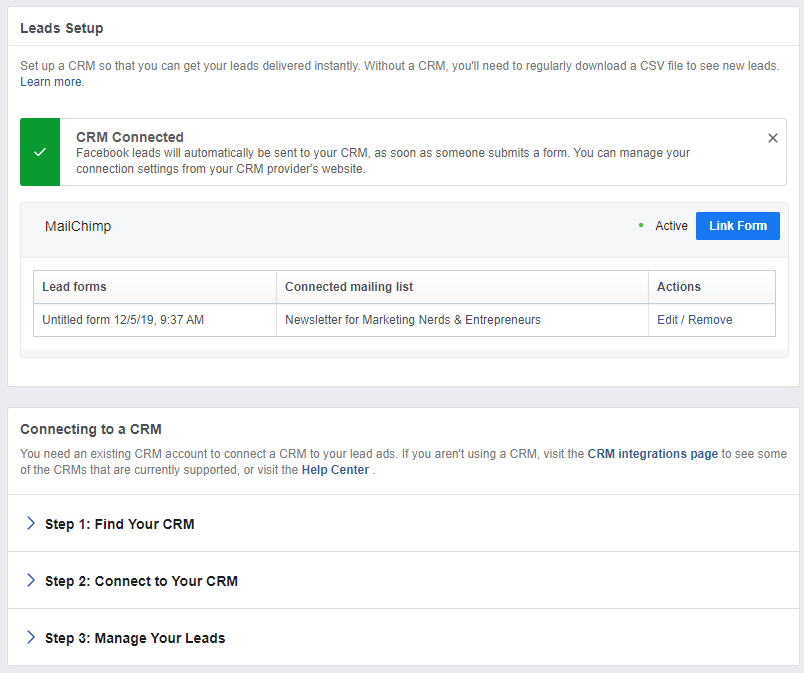
Let’s connect your lead form to your CRM.
After submission of your ad, this screen should pop up.
You click on Set Up a CRM, obviously.
If for some reason, the pop up does not show up, you can browse to the leads setup setting via your Facebook page. Click on Settings, and in the left-hand navigation on Leads Setup.
Search for the CRM you want to connect with. As written earlier, lots of tools are supported.
After selecting your CRM, connect it and map the fields from your form.
Click save and look out for the green confirmation.

Now, you want to test this, right?
Browse back to Facebook ad manager, edit the ad and click on preview. Copy the link and open it in a new browser window, submit the lead ad form.
So, within 10 minutes you can set up a Facebook lead ad form that connects to Mailchimp.
That’s the easy part, following up on your leads that make them convert might take longer than 10 minutes. 🙂
If you are also connecting Mailchimp, check out my post from 2017 that explains how to automate lead follow up with Mailchimp.
Bonus content: How can you show the lead ad form on your Facebook page?
Easy! In Facebook Business Manager browse to page posts.
Select your lead ad post and click Actions > Publish.
Again, you want to check if that worked, browse to your Facebook page.
Looks good!
Now, scroll down on this page and look for the huge newsletter sign up box.
Our newsletter for digital marketing nerds, content creators, entrepreneurs features tips like these and hand-picked reading tips.
Max. twice a month, with zero bullshit content.


